HOW TO PRINT A6 SIZE PAGES ON A MAC | PRINTING GUIDES

a6mac_pin

So you’ve done your research, you bought your perfect planner pages, and now… you’re stuck. How do you print those beautifully designed and artfully crafted planner pages that you bought maybe here? Well I am about to show you. If you’re interested in seeing all the print tutorials, you can hop on over to this page. But in this post I’m going to show you how to print A6 size pages on Windows.

So before we hop in – A6 size pages measure at 4.13″ w x 5.83″ h (or 148mm h x 105mm w) and they fit into A6 size 6-ring organizers. A6 is not a very common size in the US but is used more internationally. If you want more information on paper sizes and what planners use what size hop on over to this blog post. If you’re looking for planner pages in this specific size you can see what I offer in my shop here.

what you’ll learn:

Below I go through 3 methods for printing your planner. Whether you have a fully complete planner (like a 2018 daily planner) or a DIY, piece-it-together planner, there will be a method for you. I talk about the basic steps that you’ll need to go through, and at the bottom I include a screenshot walk-through to give you a better visual. I’ve included a walk-through of my current Canon MG7720 printer (inkjet).

from start to finish, you will need the following items:

1 a computer with Adobe Reader

I always suggest having the latest Adobe Reader program. It’s free and it works the best with my pages (and most pages) because I design in Adobe.

2 printer and printer paper

3 a paper cutter of some sort

4 a hole punch

If you want more info on planner basics check out this blog post .

and now a disclaimer:

While I try to do my best to cover as much as I can when it comes to printing, I cannot know what every printer is like. I also cannot promise that my ways of printing will work for you or will turn out as well as they do for me. I do suggest that if you are having issues with your printer you google the problem first, as those familiar with your printer will likely be able to help you more than I can. If you can’t find your answer, feel free to leave a comment and I can try my best. I also suggest that you be aware of your printers capabilities before you purchase any planner pages.

Also everything is based on using US Letter size paper as the basic printer paper.

Download disclaimer – Please don’t share any files from Rourke Planners with others – instead share the website URL with your friends, enemies, or awkward acquaintances.
Any files, free or purchased, from Rourke Planners are copyrighted works and for personal use only. You may not sell, distribute, edit, or claim any version of this file as your own. Feel free to share your usage of these files on social media – you don’t have to tag me but it’s super appreciated. Tag me on instagram with @RourkePlanners or #myrourkeplanner.

Read Me File

THE ‘AS IS’ METHOD ON PRE-CUT PAGES

This is always my suggest method of printing your planner pages. It’s not only easy for a complete, dated planner; it’s the best way to print a piecemeal planner. When you’re dealing with putting things in order while keeping things double-sided, it gets complicated. The basis of this method is that you have pre-cut pages and you print ‘as is’ – meaning in that page size.

STEP 1 – OPEN YOUR PAGES IN ADOBE READER

STEP 2 – HIT PRINT

Under ‘Page Size + Handling’, be sure ‘Actual Size’ is selected.

You can also select ‘Print on Both Sides’ in this box.

STEP 3 – HIT PROPERTIES

This box is more customized to your printer. You’ll want to be sure you have 3 things right:

size

Be sure the paper size is correct. In this case, you’ll make sure it’s set to A6 or Custom>4.13″ w x 5.83″ h. Many printers will allow you to set a custom paper size if the desired one isn’t available.

quality

Select your desired print quality. I always suggest printing at a good quality so you have a good planner. This may mean simply ‘high’ quality, or you can select ‘photo’ quality, whichever is better. You can also manually adjust the color settings on some printers to get a more accurate match to the screen output.

double sided

This may be displayed as ‘double sided’ or ‘duplex’ printing. Be sure to select it if your printer can handle it. If you aren’t sure, I suggest you just test it out. If your printer can’t do double-sided automatically, maybe you can do a manual duplex printing (it prints one side of the whole stack, you put the stack back in and it prints the other). If it can’t do double-sided at all, this isn’t a deal breaker. I just print one page at a time. It’s a bit annoying, but it’s a good chance to put something entertaining on and do some squats while you’re alternating between computer and printer.

STEP 3 – PRINT

Now all you need to do is print! And punch holes in the pages.

walk through:

asis1

1 Print Box – select ‘actual size’ and then click ‘page setup’

asis2

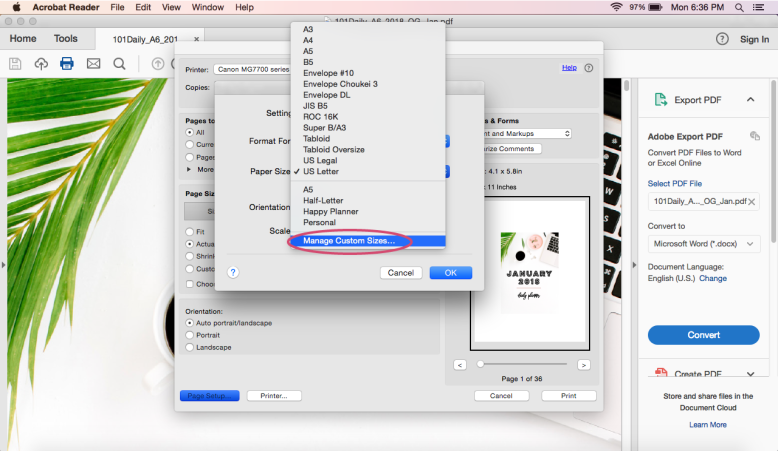
2 Page Setup – select A6 or custom size

asis3

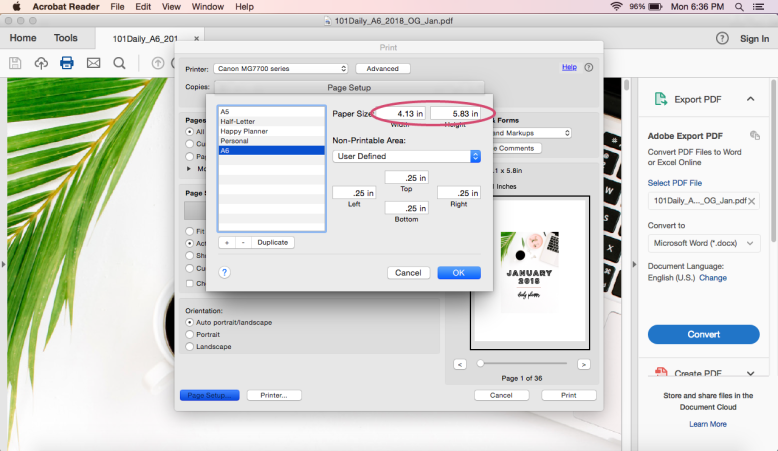
3 Custom Page Size – enter in the proper page size, then click OK and click ‘Printer’ at the bottom

asis4

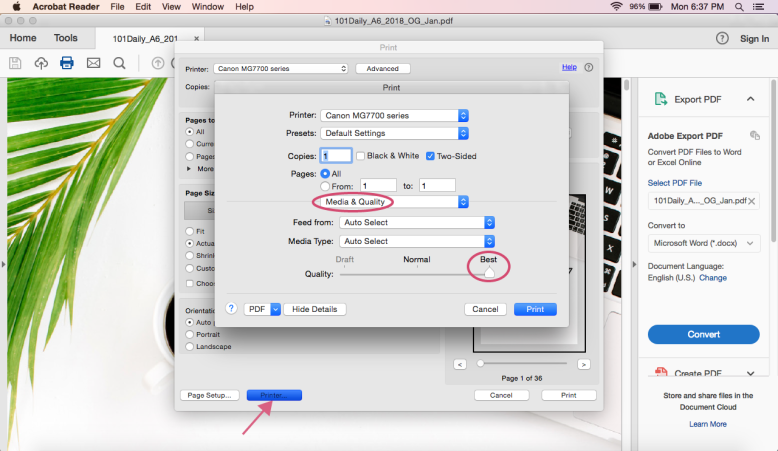
4 Printer – under ‘Media & Quality’, select high quality

asis5

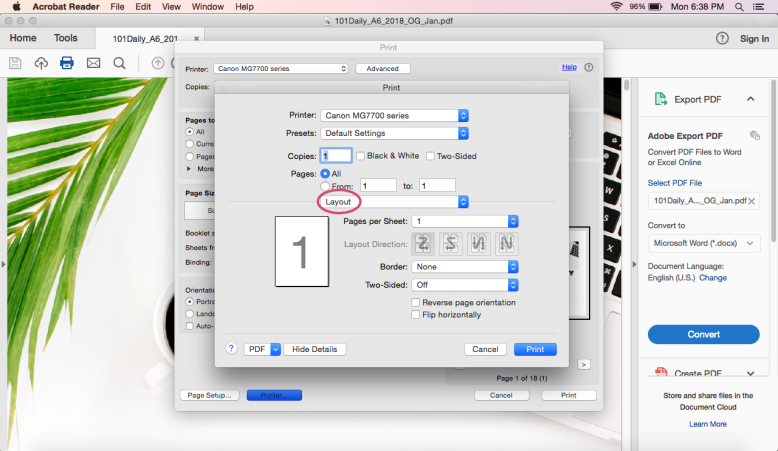
5 Printer – under ‘Layout’, select ‘long-edge binding’

Done!

THE ‘BOOKLET’ METHOD – FOR DATED PLANNERS

A6 Cut Lines PDF

This method only really works with a multi-page PDF, such as a dated planner (like the 2018 daily planner or something similar – not a planner where you fill it in yourself). If you can’t print on pre-cut pages but have a DIY planner, check the next method.

This method is for anyone whose printer cannot print on small enough paper. It will print your pages on letter size paper at their proper size. Once the stack is printed out, you fold the stack in half and bam – all the pages are double sided and in the right order. You just need to cut out the pages AFTER you print them. The benefit to this method is that your printer will print in order (for double sided pages) and you can use letter size. The downside is that it’s a real pain to cut afterwards and then get the pages in order. And in my experience the pages aren’t quite as even as when you print one page at a time.

If you’re wondering how you’ll know where to cut, I created a simple cut lines printable available below. You can print it on the paper before or after you print your pages. I cannot promise it will line up perfectly, however – that’s really up to your printer. (You can see why I suggest the first method).

STEP 1 – OPEN YOUR PAGES IN ADOBE READER

STEP 2 – HIT PRINT

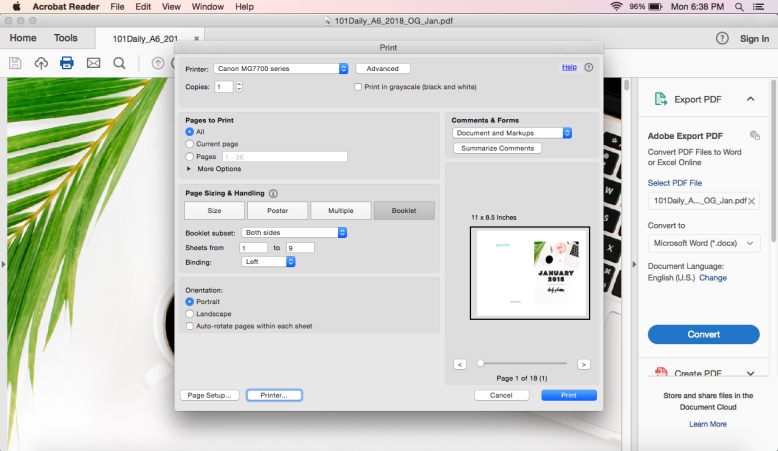
Under ‘Page Size + Handling’, select ‘booklet’. You’ll see your paper is now landscape and the cover page is on the right side.

STEP 3 – HIT PROPERTIES

This box is more customized to your printer. You’ll want to be sure you have 3 things right:

size

Because we’re printing in booklet, be sure your paper size is set to US letter (8.5″ x 11″). Otherwise everything will be super tiny.

quality

Select your desired print quality. I always suggest printing at a good quality so you have a good planner. This may mean simply ‘high’ quality, or you can select ‘photo’ quality, whichever is better. You can also manually adjust the color settings on some printers to get a more accurate match to the screen output.

double sided

So this is one that really depends on your printer. From my experience with multiple printers, you do not need to have ‘double sided’ selected as that is kind of the point of booklet printing. But I can’t know your printer. It doesn’t make a difference whether or not I click ‘double sided’ or duplex.

STEP 3 – PRINT

Now print! Once the pages are printed you may be like ‘hey they’re out of order!’, and they kind of are unless you fold that stack of paper like a playbill and everything is in order. So cut out your pages and get them in the right order, then you can punch them.

canon walk through:

booklet1

1 Print Box – select ‘booklet’ and then go to ‘page setup’

booklet2

2 Page Setup – make sure paper size is US Letter. Click OK and then go to ‘Printer’

booklet3

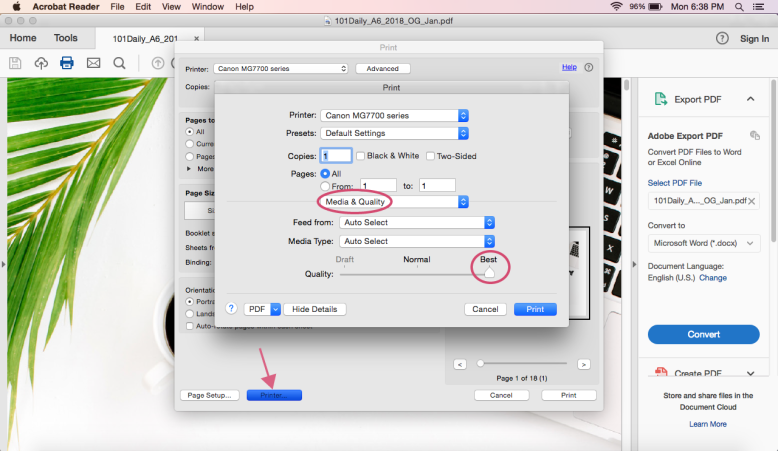
3 Printer – under ‘Media & Quality’, select best

booklet4

4 Printer – Most computers will take care of the double sided printing for you, but you may need to select double-sided printing.

booklet5

5 Done!

THE CLICK + ADD METHOD FOR RANDOM PAGES

OK, so. You have a bunch of pages and you need to print them on letter paper because your printer can’t handle the smaller paper size. And it’s a conundrum. Enter, the click-and-add template. Patent Pending. Just kidding. I created a PDF that you can insert other PDFs into, so you can print your pages in order and double sided. Personally, I think it’s super cool.

A quick word about the click & add template – You can use any image file (namely jpeg or png) OR any unsecured PDF. This is pretty cool in my book, because you can easily make your own pages in any program that will allow you to save in either an image file or PDF, and you can make your own covers. You can add in specific pages of multi-page PDFs by simply selecting the PDF (see below) and then scrolling to the right page. The template will not resize pages, unfortunately. This is how I had to set it so that it didn’t shrink down my properly-sized PDF pages. If you have any other questions about the template please feel free to comment below.

Click & Add Template

STEP 1 – DECIDE ON YOUR PAGE ORDER

Because we’re getting all DIY here, you’ll need to figure out your page order. Now if you’re just looking to do double-sided, this is pretty easy. Box 1 + 2 are the first page (front and back), box 3 + 4 are the second page (front and back). Notice they aren’t ‘in order’ on the PDF. Just follow the number and all will be well.

If you’re creating a planner that has facing pages, such as a ‘week on 2 pages’ planner, be sure to include a cover and back page so that the proper pages will face each other.
As an example:
Box 1 – Cover Page
Box 2 – MTW
Box 3 – ThFSS
Box 4 – MTW
then continue with alterating sides (so the next piece of paper, Box 1 will be ThFSS) until you have enough weeks. Then at the end, instead of MTW as box 4, it will be the back cover/notes  page/empty.

If you do it this way, then the back of page 1 is facing the front of page 2.
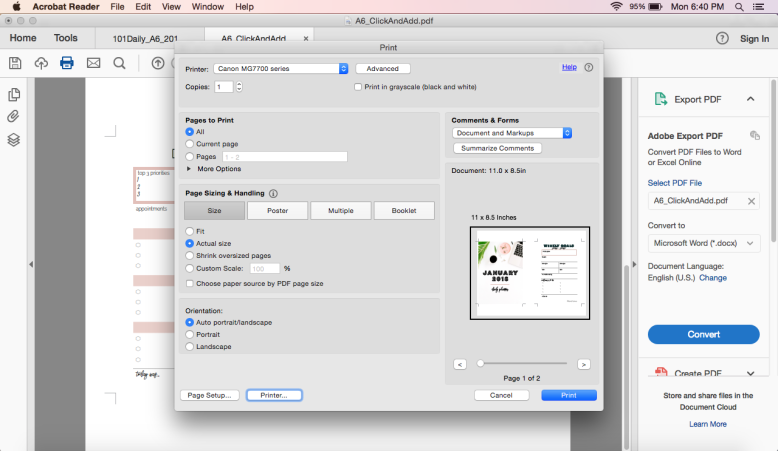
STEP 2 – HIT PRINT

Under ‘Page Size + Handling’, select ‘Actual Size’. You’re printing landscape on US Letter (8.5″ x 11″).

STEP 3 – HIT PROPERTIES

This box is more customized to your printer. You’ll want to be sure you have 3 things right:

size

Be sure your paper size is set to US letter (8.5″ x 11″).

quality

Select your desired print quality. I always suggest printing at a good quality so you have a good planner. This may mean simply ‘high’ quality, or you can select ‘photo’ quality, whichever is better. You can also manually adjust the color settings on some printers to get a more accurate match to the screen output.

double sided

You’ll want to be sure ‘Double Sided’ or ‘Duplex’ printing is selected. The significant difference for this method is that you need to change the ‘binding’ or ‘stapling’ side to short side. This makes sure the printer will print both front + back facing the same direction. Otherwise the back sides will be upside-down. Womp womp.

STEP 4 – PRINT

Print! And watch the magic happen.

STEP 5 – RINSE + REPEAT

Now just scratch those pages of your page order and do it again with the next 4 pages.


walk through:

clickadd1

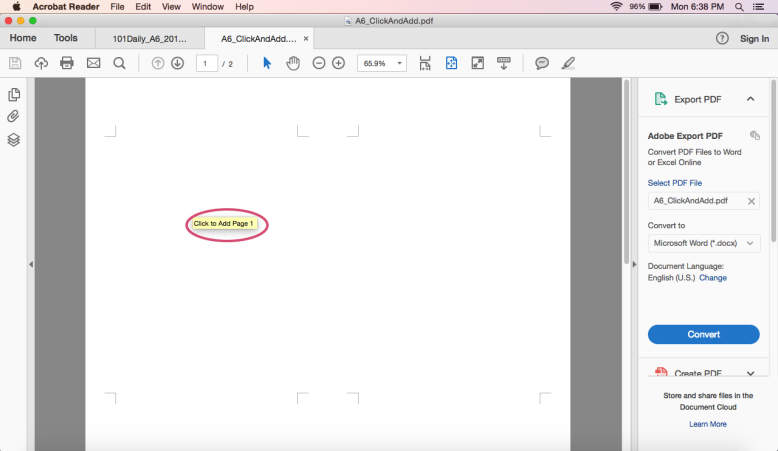
1 Open the Click and Add Template, hover over the first box. You’ll see directions over each box. Click the area.

clickadd2

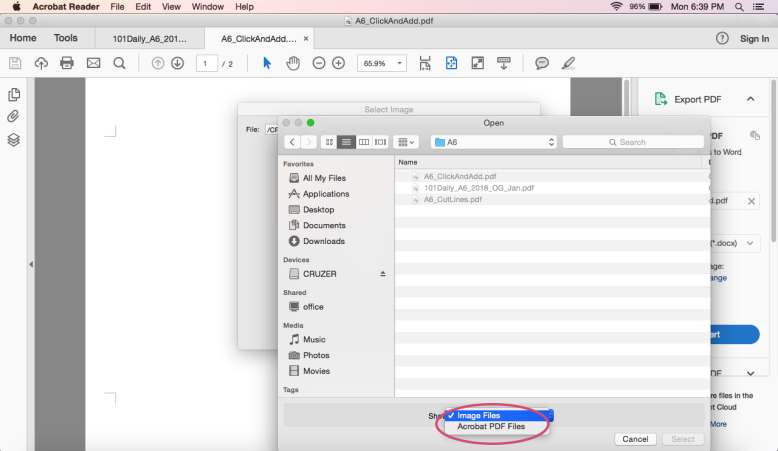
2 You’ll be prompted to select a file. You can choose either an image or PDF. Select your desired file and click OK.

clickadd3

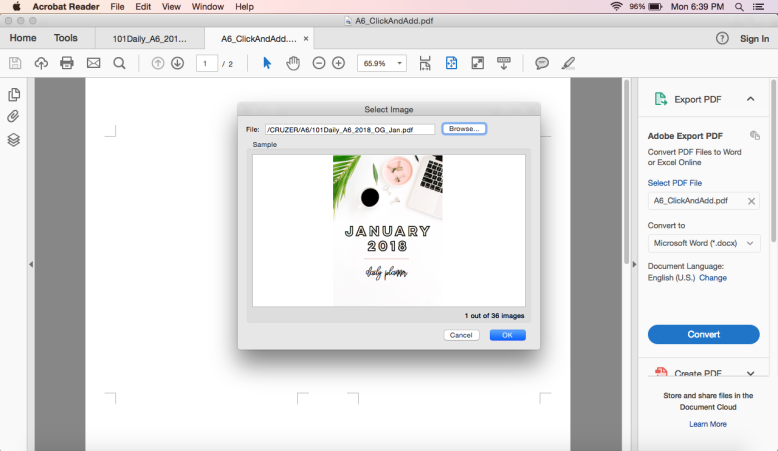
3 Your desired file will pop up in the screen. Click OK.

clickadd4

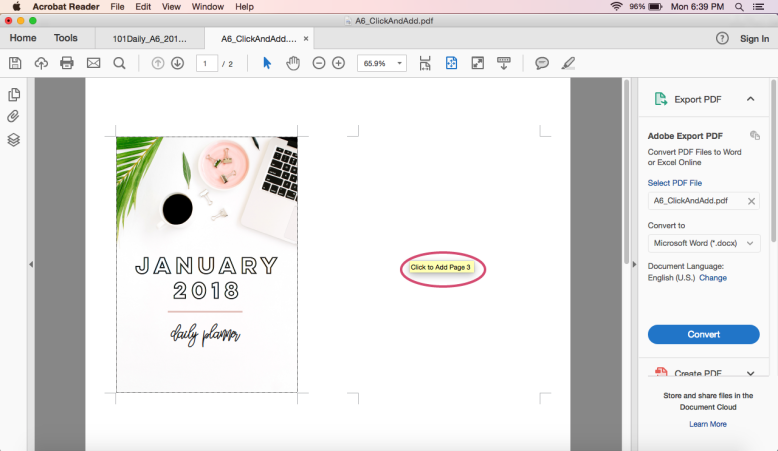
4 Repeat, paying attention to what page it tells you to add.

clickadd5

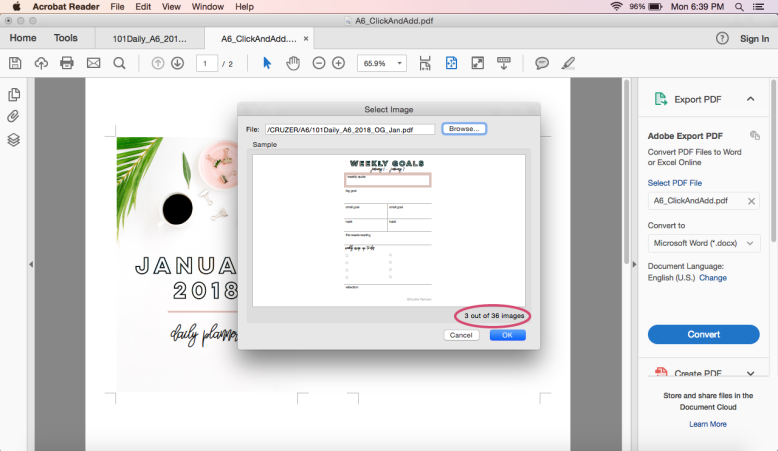
5 You can use a multi-page PDF – just scroll down to your desired page. Finish filling in all the spaces.

clickadd6

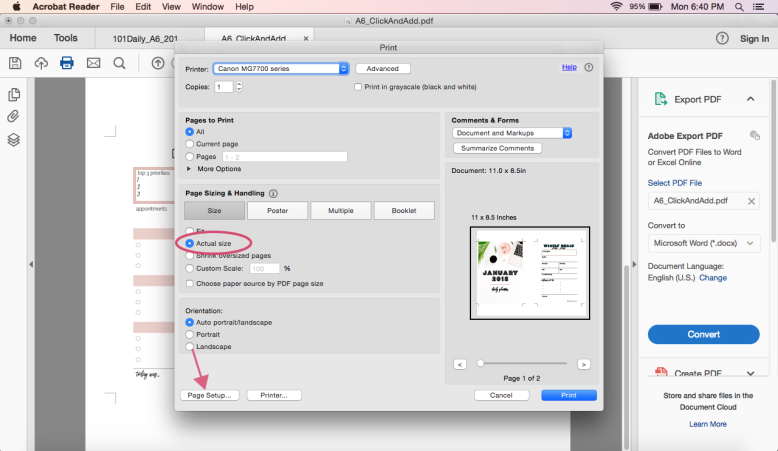
6 Print Box – select ‘actual size’ and then go to ‘page setup’.

clickadd7

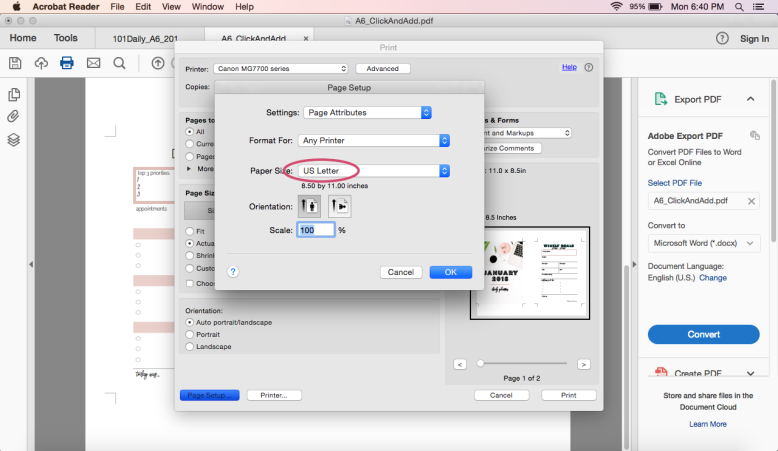
7 Page Setup – Be sure US letter is selected, click OK and go to ‘Printer’

clickadd8

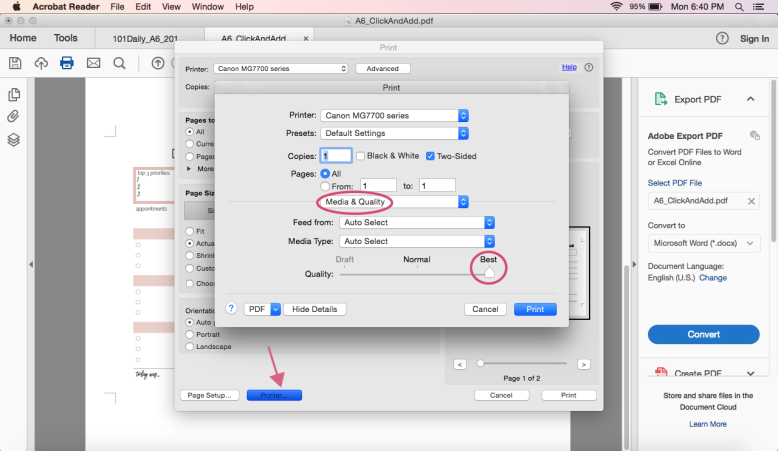
8 Printer – under media & quality, select best.

clickadd9

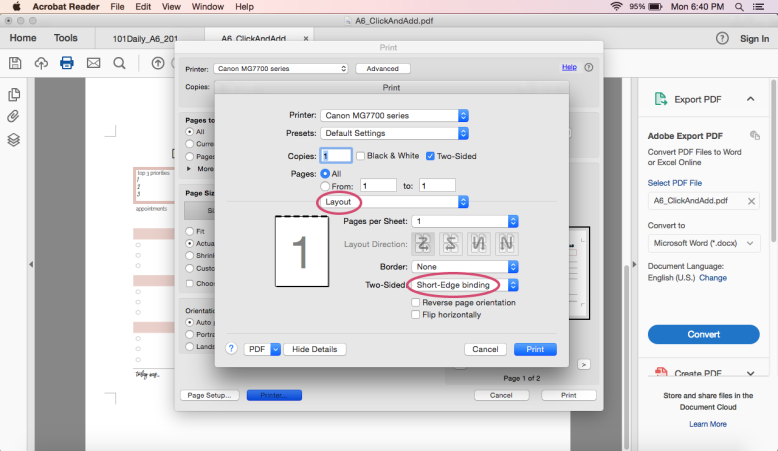
9 Printer – under layout, select ‘short-edge binding’. This is important because it will be the back of the page will be right-side up.

clickadd10

10 Done!

Hope this helps you in your planner printing! If you have any questions feel free to comment below, or if you’ve found a solution to a problem you’ve been having please comment too – I’m sure others are having that same issue. Be sure to pin this tutorial for the future.

Happy Planning!
Amanda

5 ACTUALLY USEFUL DECORATIONS FOR YOUR PLANNER

If you’ve been on Instagram any time in the past year you’d have seen that the fad of majorly decorating your planner is still going strong. Stickers everywhere, stickers for every activity, washi tape covering all the other spaces stickers aren’t. It can be…. overwhelming. Not only because it’s just color EVERYWHERE, but because some people think that’s what you need to have a productive planner. And that’s definitely not the case. You can have a pretty and useful planner that helps you tackle your tasks and achieve your goals, without the clutter.

Now I just want to say, you do NOT need any decoration, in fact, to have a useful planner. Heck, a scrap of paper will be A-OK for just your daily to do list. But I’m not that kinda girl and I’m guessing many of you aren’t either. I like mine to be clean and cute. Pretty and productive. Achievable and another alliteration.

1 COLOR CODING

Color coding is a great way to bring some color into your planner while not distracting from the purpose. There are a lot of different ways to color code – by family member, by importance, by area of your life, by project. The nice thing about this is that you can keep a color theme for your planner while not spending any extra time doing any decorating.

You can color code with any pens, highlighters, or markers you have around. I’m a fan of fine felt-tip pens like Papermate Flair or Staedtler, but lately I’ve just been using a super-fine tip gel pen, which you can also get in multiple colors. Or just use whatever you have, even that bucket of 120 gel pens. You can also use highlighters or underline with markers.

2 FUNCTIONAL STICKERS

I know. You weren’t thinking I’d include stickers on here. But here me out. I like using functional flag stickers to make something important stick out (think appointments, meetings, events), for repeating events (like Cubs & Blackhawks games), and for things I’d rather not do but must. For the first 2, I use a simple flag sticker and write on the sticker the details. The third one – I don’t necessarily WANT to meal prep most weeks, or work out, or do laundry. But if I put a sticker down, I feel more obligation to do it. It’s much more obvious crossing out a sticker than it is crossing out a task or habit – the sticker guilts me into doing the thing.

Now you don’t necessarily need real stickers to achieve this – if you would rather, you can just make a little box or flag with highlighter or marker and write in that space. It will still stick out compared to the rest of the page.

If you still want, I’ve included a super simple flag sticker sheet – no colors, no details. Open it and fill it in with your desired colors. Then print + cut. I’ve also included a file for those of you who don’t have a silhouette.

3 WASHI THE EDGES

OK so usually this isn’t really functional, per say, but it is super easy and pretty. I guess it’s a bit functional because I’ll use the same washi for the week (in my daily planner), so I can flip week to week easier. Buuuut that’s not really why I do it. I simply apply a strip of washi so that half the washi is on the paper, then I flip the page over and press down the other half. Then I cut off any excess. I just like doing this to change up my planner every so often (because I don’t switch planners or decorate, I rarely even switch my dividers).

If you’re looking for washi, check out this blog post where I talk about my favorite shops.

4 CHANGE OUT YOUR DIVIDERS

This is a really easy way to change up your planner while not bulking it up with silly stuff. Changing out your dividers every so often is a great way to keep from getting bored (and possibly changing your entire planner). Especially if you have the standard dividers that came with your planner, new dividers will really spruce things up. You can either make them or buy them (there are plenty on Etsy). I’ve shared divider templates before, but feel free to search ‘diy planner dividers’ on Pinterest for tons of tutorials and ideas. And while you’re at it, change out the sticky notes and other planner paraphernalia to coordinate with your new dividers.

5 USE A TODAY PAGE MARKER

I love using a page marker for my planner because, frankly, it would be really annoying to have to find my page AGAIN. I always to try to put my planner away at the end of the day, and frankly it feels really good to move that marker over at the end of the day. Now you can really use anything to mark your page – a cute paperclip, a ribbon, a post-it. But I like having a little mini-divider with a top tab. And you can put anything on it. Just have it be a pretty pattern, a special quote, a key to your color-coding, your daily schedule, or a list of your daily habits. Bonus points if your daily habit list is laminated so you can mark it off daily and then wipe it down to reuse.

I’ll be posting a sa-weet freebie Thursday for this, so keep your eyes peeled.

So these are the things I like to use that keep my planner looking nice. One other thing you can do is switch to some pretty planner pages or switch page styles if you’re looking for a change. I, of course, design my pages to be pretty all by themselves so even if you don’t use ANY decorations, they still look really nice.

Comment below with what you do in your planner to make it pretty!

WHICH PLANNER IS RIGHT FOR YOU?

There are a LOT of different options for planners, and today we’re going to talk about which one might be right for you. This isn’t going to be so much about the insides, more about the outsides.

PREBOUND

There are lots of pre-bound options that you can look at, and lots of places you can buy them. You can find them anywhere from Dollar Store to Louis Vuitton. And the type of planner and layout will vary for all of them – so there’s no way I can cover them all. I’ll just share my favorite places to buy them.

PROS – It’s just purchase + plan, no fussing over inserts and printing. Perfect for those who just need something to keep track of their days and keep a few lists.

CONS – Not reusable. Depending on the type of binding, you can get rid of the paper and keep the cover and binding to reuse, but then why not use a ring-bound or disc-bound system. So it can create more waste. Also it is not really customizable (unless you buy a customized one on Etsy).

SIZES – Prebound planners come in all different sizes. They can be very small to Letter or A4 size.

TYPES OF BINDING

wire bound

There are really 2 types of wire-bound planners – the continuous spiral of typical school notebooks and the zig-zag like pattern that creates a ring. Both are very similar, but I will say that the Zig-Zag type is easier if you wish to refill/change pages (certainly not as easy as rings or discs, but ya know, not impossible).

PROS – Easy to use, lays flat, ability to remove/add/switch pages, inexpensive, extremely common. You can find tons of options to choose from.

CONS – Not easy to add/switch pages, so you’re generally stuck with what you buy – not that customizable.

COST – $ – $$$$

booklet bound

This type of binding is by far the cheapest, and you usually won’t find it for any full planners – more just for monthly calendars or partial-year weekly. It’s a good option if you’re looking for a small, thin notebook to keep in your bag. You can also find this commonly as part of traveler’s notebooks.

PROS – Small, compact, perfect for carrying around.

CONS – No customization, small amount of pages included. Can’t remove used pages.

COST – $ – $$

book bound

This type of planner is good for those who like a more luxurious planner or those whose planner is more like a diary. A book bound planner can lay flat, eventually, but you’ll need to ‘train’ it to – that is, put a book or something heavy on the opened pages.

PROS – Beautiful, common at stationery stores. Keepsake quality.

CONS – No customization, has a hard time laying open, can’t remove used pages.

COST – $$ – $$$$$

POSTBOUND

When I say post-bound, I’m talking about planners whose pages and binding are separate – you can easily take out and add pages as you wish. Postbound is my jam – I like the ability to add in and take out any pages I want to. If you want more info on the 3 types of Post-Bound Organizers you can check out this blog post.

PROS – easily customizable, you can switch out the covers without changing the insides – perfect for those who get tired of their planner often. Use any pages you want with any covers. Lots of accessories and fun planner things. All options lay flat when opened. When the year is over, you can recycle the paper pages and keep everything else, making it a lower-waste option. You can buy pages precut and punched, just put them in the binding.

CONS – More work (if you want). Bulkier than prebound. Most options are more expensive than most options of prebound.

SIZES – Ringbound planners can be A7 size, discbound can be as small as you can make it. They can also be up to Letter/A4 size.

TYPES OF POSTBOUND

binder

This is often most peoples entry into postbound planners. It is the perfect budget option. It’s also a great option for things like recipe books, home planners, and keeping family schedules. Binders can be reused infinitely. They don’t have a lot of things like pockets and pen loops, but you can put in a zipper pocket on the rings. Binders are available in 2 sizes – US Letter and Half Letter/Junior.

PROS – cheap & convenient – you can find them at most office & home stores. Variety of designs & quality. Super easy to use & customize. Switching pages is just a matter of opening the rings, taking pages out, putting new ones in. Hole punchers are cheap. Lies flat.

CONS – Only 2 sizes (Letter & Half-Letter/Junior). If you want traditional planner things like card holders and pen loops you’ll need to do some DIYing or purchasing. Very bulky – not really for travel.

COST – $ – $$

ringbound

This is the most common type of post-bound planner – FILOFAX! These organizers come with pages already in them and you can purchase pre-printed & punched to put in your organizer (or you can download digital pages to print & cut yourself). There’s a huge variety of designs, quality, and sizes. You can buy leather ones that last for years and years, canvas, or plastic ones. You can also find a good market for second-hand options. These can be very basic & cheap, or quite luxurious. They can be pink & sparkly or corporate conservative. These 6-ring organizers come in a variety of sizes – A4, Letter, A5/Half-Letter, Personal, A6, A7, Mini, and Pocket.

PROS – Super customizable – switch out pages & accessories, put your pages into a different organizer, pick & choose your pages. Travel friendly. Spaces for pens, cards, etc. Lots of size options available. Lots of designs, quality, etc. available. Second-hand options. Lies flat (except for some new ones)

CONS – Most expensive option at the beginning. Bigger than a wire-bound. Hole punches can be more expensive. Inserts from big companies are generally poor quality – but better ones can be purchased on Etsy.

PRICE – $$ – $$$$$

discbound

This is becoming more popular thanks to the brand Me & My Big Ideas (The Happy Planner). This is a great option for those who want flexibility but also want to keep things budget-friendly. The pages are bound together by having a special type of punch and being held together by rings with a lip around the edge. Most disc-bound systems are actually notebooks, but you can easily put in your own pages. Sizes are Letter & Half-Letter for more traditional systems, and Happy Planner has their traditional size & a mini Happy Planner size. Because of the nature of the discbound system, you can actually create your own planner in any size you want! Happy Planner also released covers this past year.

PROS – Very customizable. You can switch out the rings, the covers, the pages inside. Lies flat. Inexpensive. Available in a few sizes, but you can create your own in any size. Travel friendly. Hole punch isn’t expensive.

CONS – Not the most secure for your pages. Hole punch isn’t the cheapest. Customization of the cover isn’t the easiest because it requires a purchased cover or a very heavy lamination. Hard to make it luxe, if that’s your thing.

COST – $ – $$$